
To accept bookings for an event you need to install Event Organiser Pro alongside Event Organiser. If you haven’t done so already, you can purchase Pro here: wp-event-organiser.com/pricing.
Event Organiser automatically creates a booking form for you when its installed. This form only contains two fields which cannot be removed because they may be required – but do not appear if they are not needed:
-
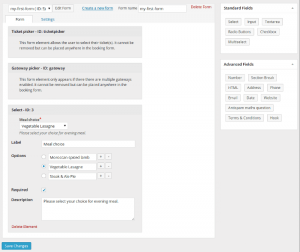
Ticket selection: This is the interface that allows the user to select the tickets (and quantity) they wish to book. If you have a recurring event and are selling tickets by date then the user will first have to select which date they are booking for. If you have enabled ‘Simple Booking Mode’ this field will not appear.
-
Gateway selection: This field allows the user to choose their method of payment. It only appears when at least one of your tickets is not free and you have multiple gateways enabled.
Editing your booking form
You can edit, create and remove booking forms from Settings > Event Organiser > Booking forms tab. This page also allows you to add, remove or edit form fields.
If you have multiple booking forms you can use the drop-down in the toolbar to select the booking form you wish to edit and then click ‘edit form’.
Adding custom fields
To add a custom field simply click the appropriate field type on the right hand side. If you click the added form field, the options for the field are revealed.
The avaiable field types are:
Basic
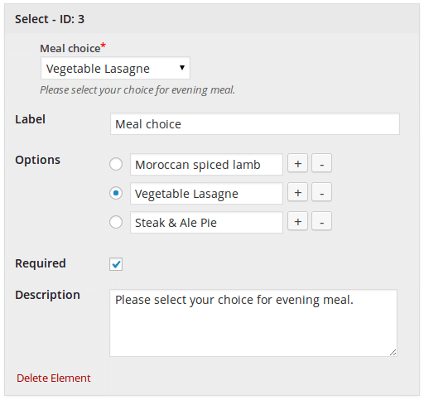
- Select – allow the bookee to select one of a set of pre-defined options
- Input – simple one-line text field
- Textarea – a multi-line text input field
- Radio – radio buttons to allow the bookee to select one of a set of pre-defined options
- Checkbox – one or more checkboxes, bookee may select multiple options from a pre-defined set.
- Multiselect – multiselect field, bookee may select multiple options from a pre-defined set.
Advanced
- Number – require a numerical input, with optional lower and upper bounds.
- Address – a form field which provides input for the various components of an address
- Phone – a one-line text field for phone numbers
- E-mail – a one-line text field for e-mail address. The entered value is checked to be a valid e-mail.
- Date – a datepicker, the input format can be specified in the field’s settings
- Website – a one-line text field for urls. The entered value is checked to be a valid url
- Anti-spam – A simple maths questions to help prevent spam
- Terms & Conditions – Displays your terms & conditions and requires the user to aknowledge them
- Hook – Triggers the specified WordPress hook
- HTML – Allows the admin to enter arbitrary HTML into the booking form.
- Fieldset – Wraps all fields (until the next fieldset element) in a
<fieldset>tag. You can optionally provide a label for the fieldset. - Section – Add a section heading to the booking form
Your form settings
On the booking form settings page, switch to the form’s settings tags. Here you can change:
- Enable Simple Booking Mode – Enable simple booking mode (provided you are only offering 1 ticket for the event).
- Bookings Title – the title of the booking section
- Submit button text – text for the submit button
- Submit button classes – HTML classes given to the submit button (for theme compatability)
- Notice classes – HTML classes given to alerts on the booking form (for theme compatability)
- Error message classes – HTML classes given to error notices on the booking form (for theme compatability)
The toolbar at the top also allows you to specify a name for your booking form. This is only used to help you identify the booking form on the event admin screen – which is useful when you have created several booking forms
Create a new form
Each booking form may be re-used across any number of events. However, you can also create as many booking forms as you required. To create a booking form click ‘create new form’ on the toolbar. A new form will be created, populated with the default fields. You may optionally name the booking form to help distinguish it from the rest.
Deleting a form
To delete a form, simple select the form to be deleted, click ‘edit form’ and then, once viewing the appropriate form, click ‘delete form’. This action cannot be reversed.
Selecting a booking form for your event.
Once you’ve created a booking form you can now select it to be used for your event. If you only have one booking form, you do not need to do anything. Otherwise, got to your event’s admin page, and below the ticket options select the booking form from the drop-down list.
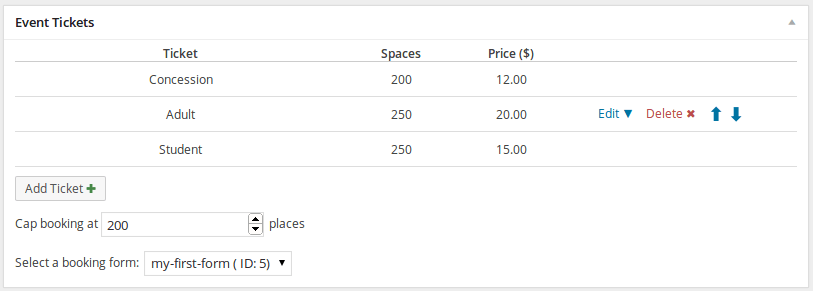 The available forms appear below the ticket list, and display the name and the ID of the booking.
Downloading submitted data
You can download the data from custom fields, along with the booking details on the booking admin page. See this page on exporting booking data